This year I made a small bed-side lamp for my fiancée’s birthday. She is going to Canada for one year and I wanted to make a gift commemorating the occasion. I originally wanted to do a travel tag in metal. But it lacked a bit of contrast. I also feared that it might get a bit too much beaten up and messy after a few trips. I then decided the repurpose the decorative nametag plate into a bed-side lamp !
First let’s start with the front decorative plate. I first drew a design on tracing paper. My design has two features : the outline which will be cutout with a jeweler’s saw and the continents which will be textured with a hammer.

The design was copied on tracing paper and pasted a 1mm thick cupronickel metal plate. I cut, hammered the plate and here is the result :

I did not record each step of the process for the front plate but will illustrate bellow the cutting process on the text of the backplate. I put a small message with the date so that we can remember her 1 year study abroad. similarly to the front plate, I drew the message on paper and copied it on tracing paper. I used a marker pen on the version pasted to the metal for good durability and contrast. The written part is actually the one facing the glue (PVA glue). This avoids the image being erased by the cutting oil while cutting the metal. I then used a 0.5 mm drill to create small holes which are entry points for the jeweler saw. I then enlarged those holes in the direction of cutting with a very small #6/0 jeweler’s saw before cutting the final design with an #3 saw blade.
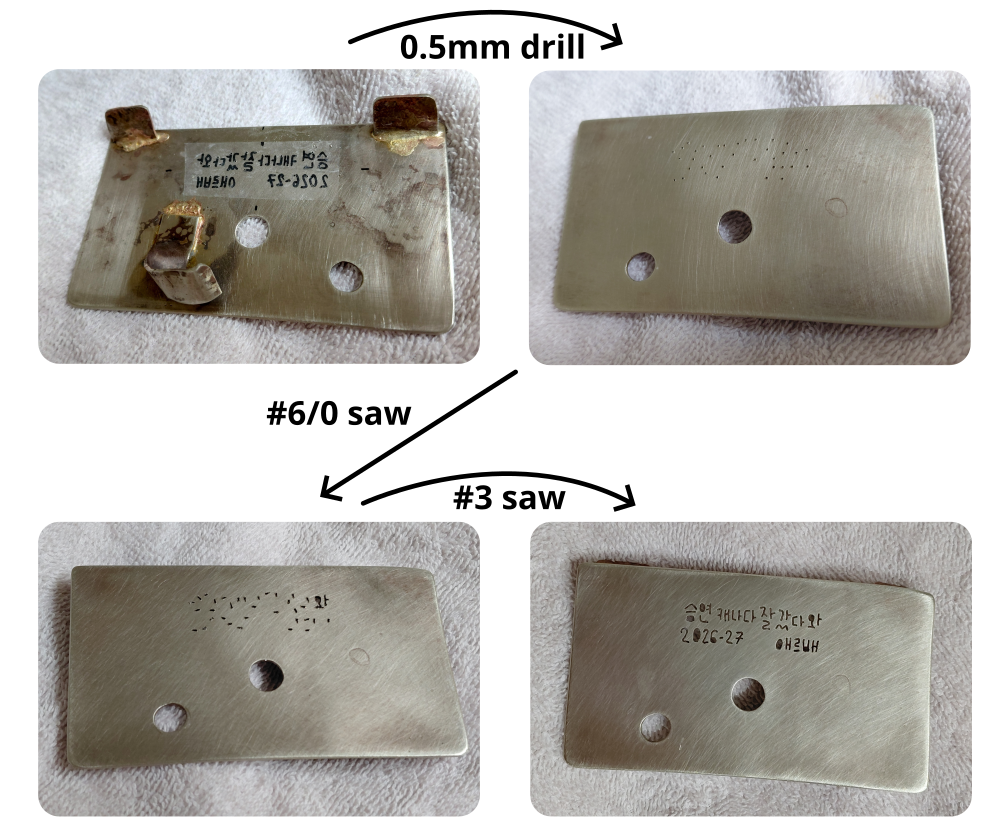
I used a similar process for the front plate but with two line thickness; (0.5mm | #6/0 | #3) for the main characters and a thinner (0.4mm | #8/0 | #3/0) for the details. I will note that you will save a lot of time using good quality drills at those very small diameters, if using the cheapest 0.5mm drill, you might break as many drills as hole you make. In the end the best drill I found were some “Nachi” drills, a bit expensive but none broke on more than 30 holes in the backplate. To make the holes, I used an “egg beater” style drill. I use exclusively manual drill machine to make holes and those work really great. They enable you to feel the cutting action which is important with thin fragile drills. Something else important is a bit of cutting oil. Specialized cutting oil is great but if you have nothing, a cooking oil will still decrease the number of broken drills.
I then had to assemble the front picture and back plate into a box. One of my dream is to learn copper chasing and repousse which could have been useful here, however it’s hard to use a hammer continuously in an appartement, so for now I chose to braze and solder the pieces together. I also made a latch mechanism with two registration pin and a folding tab which holds the back plate to the front box. Finally one screw holds the two piece together with a feet.
The box edge was assembled by brazing with a brass filler rod and then the front was fixed with lead free solder (mainly Tin with a small amount of Silver). Since this solder melts at ~200°C, this made it easier to position and protect the front plate with Kapton tape. I also had to avoid having solder flow inside the picture gaps so I temporarily filled those with “heat shield” ceramic clay. Once everything was soldered I grind all corners flat with a file and sand paper.

I then installed some led in the box. I got them by cutting a 5V LED bar. The bar already was lined with double sided taped which made installation easy. I soldered the LEDs and connected them with a connector. To make the illumination uniform I also added a piece of paper against the backplate before closing the box.

The resulting lamp is shown above it looks the best at nigh with the illumination (image below). It is powered via USB with a USB dimmer to vary brightness. My fiancée was really moved by that gift ♥ .
